Categories
Tech

macOS 10.12 Sierra GA-X58A-UD3R Hackintosh install (Clover)

macos-sierra-logo

With the recent release of macOS Sierra 10.12 (previously OS X) my current OS 10.10 Yosemite install has been pushed to n-2 support status (Apple supports 2 versions prior the current release), meaning Apple will drop support for security updates upon the next release of macOS, presumedly due 2017. This means the time has come to update my 10.10 Yosemite install to 10.12 Sierra.

I decided to just skip the 10.11 El Capitan release and perform a fresh install. Over the weekend I managed to get a fresh Sierra install working on a spare HDD, allowing me to test its stability whilst still running my daily workhorse Yosemite install.

Nearly everything works as it should; bluetooth, GPU HW acceleration, sound, ethernet. Once again the only thing not working properly is sleep/wake/hibernate. But I remain persistent to get those working with this release and install.

Below is a summarised step of instructions I performed to get a persistent working install, please note you will need access to an existing installation of OS X to perform the Hackintosh installation.

  1. Download the latest version of Sierra through the Mac App Store on the existing Mac.
  2. On a Windows installation, insert an 8GB (minimum) USB drive and quick format it to FAT32.
  3. Insert USB stick into the existing Mac and use Disk Utility to name the drive ‘USB’ as well as formatting the volume type: Mac OS Extended (Journaled).
  4. Using terminal, create a bootable USB installer by entering the following command
    sudo /Applications/Install\ macOS\ Sierra.app/Contents/Resources/createinstallmedia --volume /Volumes/USB --applicationpath /Applications/Install\ macOS\ Sierra.app --nointeraction
  5. Download the latest version of the Clover bootloader (r3793 at the time of writing)
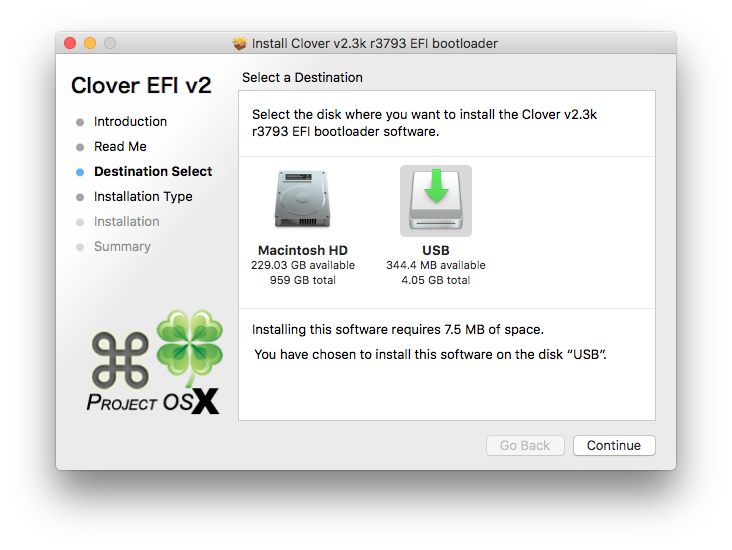
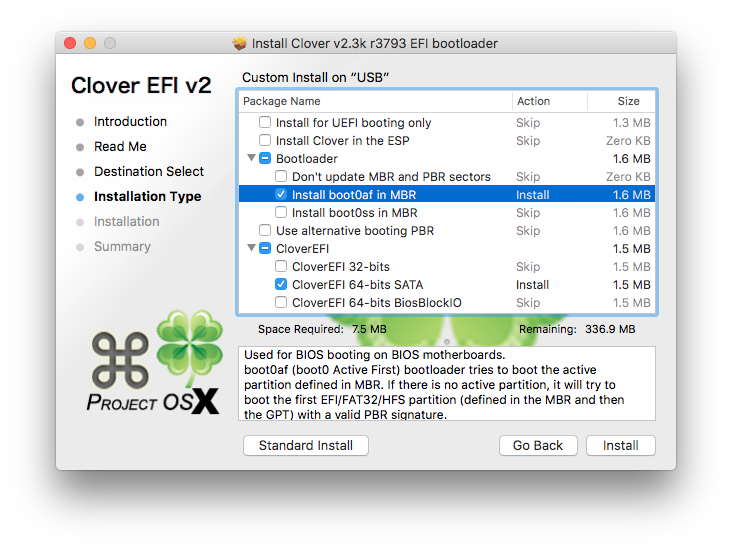
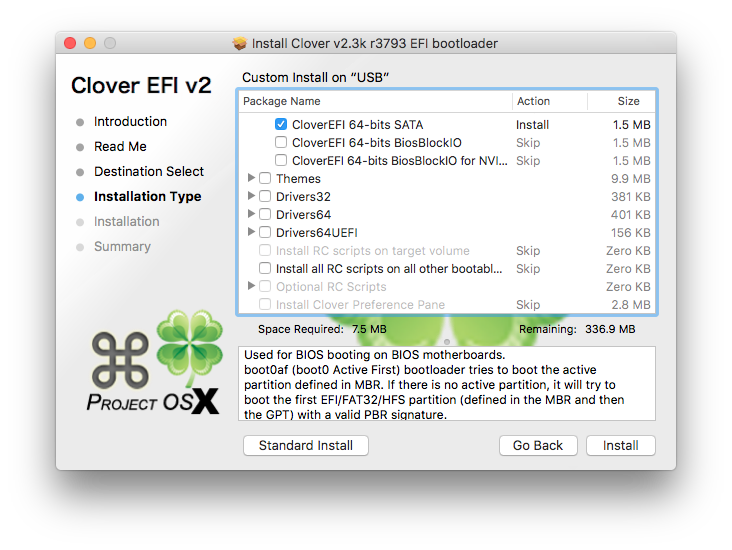
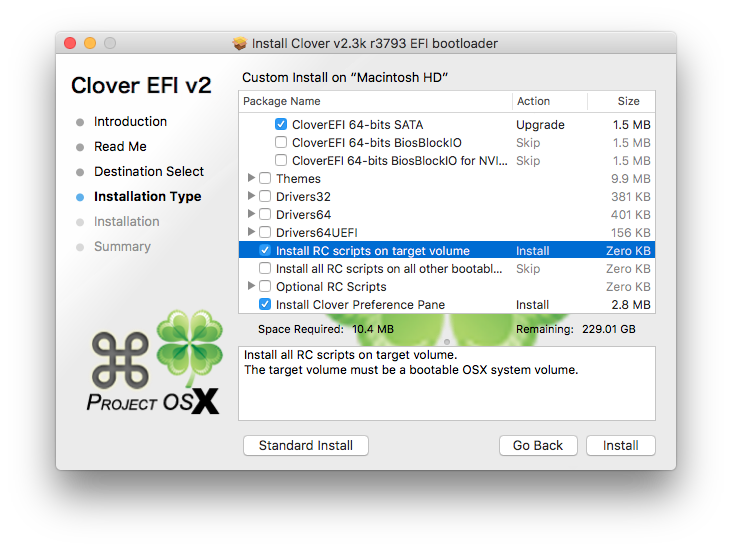
  6. Run the Clover installer and ensure that the USB is selected as the installation location, customise the config to mirror the settings below
    Select USB as the installation location
    Clover configuration options for GA-X58A-UD3R page 1
    Clover configuration options for GA-X58A-UD3R page 2
  7. Replace on the drive /EFI/CLOVER/config.plist with the config provided here
  8. Download and extract FakeSMC, NullCPUPowerManagement and RealtekRTL8111 to EFI/CLOVER/kexts/other
  9. Insert the USB in the X58A-UD3R Hackintosh, hit F12 on boot and boot from the USB installer
  10. When prompted by the Clover bootloader, boot from the macOS installer USB
  11. Install macOS Sierra as normal to your target drive. When the installer reboots the machine, ensure that you boot from the USB key again using F12, but then select to boot from the target drive in the Clover menu to finish off the installation
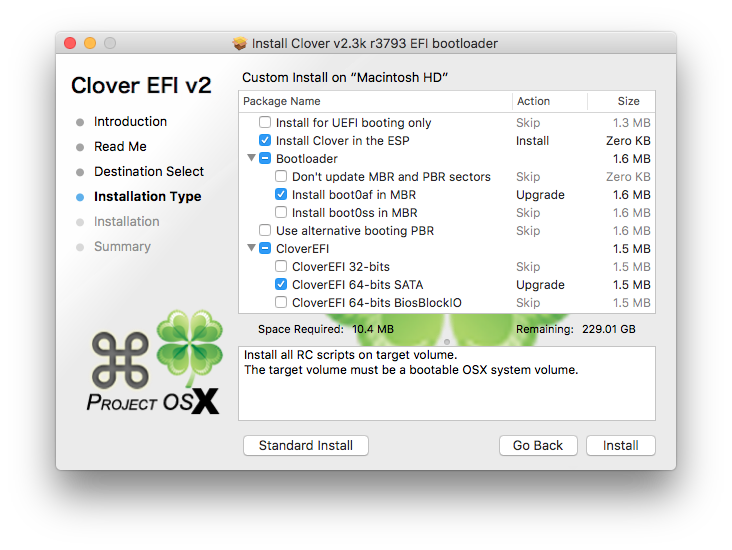
  12. When the install is finished, download Clover again and install it to the target drive using the following settings
    Ensure that the target drive is selected for the installation location
    clover-legacy-config-options-page1
    clover-legacy-config-options-page2
  13. Mount the EFI partition on the target drive using Clover Configurator
  14. Replace on the EFI partition /EFI/CLOVER/config.plist with the config from the USB
  15. On the EFI partition; create a folder at /EFI/CLOVER/kexts/10.12 and copy FakeSMC, NullCPUPowerManagement and RealtekRTL8111 from the USB into it.
  16. Download the relevant DSDT file for your X58A-UD3R (dependant on installed BIOS) from the DSDT database here and rename/copy to the EFI partition at /EFI/CLOVER/ACPI/patched/DSDT.aml
  17. Reboot the Hackintosh, remove the USB and you should be able to boot the target drive using the Clover bootloader (now installed on the target drive itself)
  18. I was able to get audio working by using clover configurator to disable SIP and then using Toleda’s scripts for Sierra to fix the audio

This install is still a work in progress for me and will be updated as time goes on and I hopefully get more things working.

Categories
Tech

How to: Configure FreeNAS 9.3 for Time Machine with disk quotas

FreeNAS Logo

FreeNAS is an amazing software stack and purpose built for hosting dedicated file storage shares, so it makes for an excellent platform to host a Time Machine compatible network share for use with OS X.

I wanted to build a server that would provide a reliable backup location with data redundancy for multiple Macs, with the ability to scale the storage space to meet future needs. Something which the current line of Apple TimeCapsules don’t offer, not to mention they are expensive for what they offer.

This setup will allow any Mac on the local network to backup to a central server using Ethernet/Wireless. I have gone the extra mile and included the ability of being able to remotely backup my MacBook Pro when away in London to my FreeNAS server at home using my OpenVPN server, but that’s for another post.

To clarify this was my first time using FreeNAS, I had no prior experience with the platform before writing this guide, so anyone should be able to recreate my setup with no prior knowledge of FreeNAS. My post is an updated version of an existing article I found, but is also a result of my own trial and errors. It takes time to figure out what works and what doesn’t.

Hardware

For storage I picked up 4 x WD Red 3TB for NAS (Inc WD Express Warranty) for £91.99 each (£183.98 total). I picked the 3TB over the 4TB partly because of cost, but namely for reliability as numerous forums discuss high failure rates for the 4TB models.

I decided to utilise one of my G7 HP MicroServers as a dedicated FreeNAS server. The 2 WD Red drives were installed for storage, as well as a 32GB SanDisk Cruzer for the FreeNAS OS. I also maxed out the 16GB Kingston ECC RAM to help cope with the ZFS filesystems (the minimum recommended is 8GB).

Prerequisites

FreeNAS 9.3 Homepage
You need to have a working install of FreeNAS before you can attempt this guide. I won’t detail over the OS installation as it’s fairly simple and has been documented numerous times over online, without forgetting to mention the amazing documentation that comes with FreeNAS Doc.
FreeNAS 9.3 is the current release at time of writing and is what this guide is based on, although future versions should also work fine.

Create ‘time-machine’ Group

The first step is to create a system group for the Time-Machine share in preparation for adding users.
Under the ‘Account’ menu item, expand the ‘Groups’ item, then select ‘Add Group’. Note that in my screenshots I already have a group called ‘Time-Machine’, your system won’t have until you complete this step.
Add Group in FreeNAS for TimeMachine

An ‘Add Group’ dialog box should pop up, prompting you to create the new group.
FreeNAS Group Settings
Set the config as follows:

  • Leave ‘Group ID’ to whatever it is by default
  • Set ‘Group Name’ to ‘time-machine’

Leave everything else as default and click OK. Our newly created ‘time-machine’ group should be visible under the ‘Groups’ section now.

Create and Configure Time-Machine ZFS Dataset

Now it’s time to create the ZFS dataset which will be used to store the Time Machine backups. You must have a ZFS volume already created for this step, if you haven’t got one then you should go read through the ZFS primer in the FreeNAS docs.

Under the ‘Storage’ tab select the ‘Volumes’ menu item, then select your ZFS volume (Volume1 in my case) and then select ‘Create Dataset’.
FreeNAS Create ZFS Dataset for TimeMachine

A ‘Create ZFS Dataset’ dialog box should pop up, prompting you to create the new ZFS dataset.
FreeNAS Create ZFS Dataset Dialog
Ensure the wizard is in ‘Advanced Mode’ and then set the config as follows:

  • Set ‘Dataset Name’ to ‘Time-Machine’
  • Set ‘Quota for this dataset’ to ‘1000 GiB’

In the section option we are specifying a quota for the dataset, effectively settings the size of available disk space for our Time Machine backups. Change the value if 1000 GiB is not suitable for your setup.
Leave everything else as default and click ‘Add Dataset’. Our newly created ‘Time-Machine’ dataset should be visible under the ‘Volumes’ section now.

Now we need to configure the permissions for our ‘Time-Machine’ dataset, so that our ‘time-machine’ group has read/write access.
Select the dataset (Time-Machine) and then select ‘Change Permissions’.
FreeNAS Change ZFS Permissions

A ‘Change Permissions’ dialog box should pop up, prompting you to edit the ZFS dataset.
FreeNAS Change ZFS Permissions Dialog
Set the config as follows:

  • Set ‘Owner (group)’ to ‘time-machine’
  • Set ‘Mode’ checkboxes to the same as mine in the screenshot

Click ‘By setting the group owner to the ‘time-machine’ group, we are granting any users of that group read/write/execute permissions.

Create Time-Machine Users

Now it’s time to create a separate user to represent each computer that will use the FreeNAS server for Time Machine backups.
Under the ‘Account’ menu item, expand the ‘Users’ item, then select ‘Add User’.
FreeNAS Create User Dialog
Set the config as follows, but change the relevant information related to your setup:

  • Leave ‘User ID’ to whatever it is by default
  • Set ‘Username’ to ‘dans-macbook-pro’
  • Ensure ‘Create a new primary group’ is deselected
  • Set ‘Primary Group’ to ‘time-machine’
  • Set ‘Full Name’ to ‘Dan’s MacBook Pro’
  • Set ‘Password’ to something strong (mix of; uppercase, lowercase, numbers, 16 chars long)

Leave everything else as default and click OK. Our newly created ‘dans-macbook-pro’ should be visible under the ‘Users’ section now.

Create Time-Machine AFP Share

The last step on the FreeNAS server is to create the AFP Share that will broadcast the storage on the local network.
Under the ‘Sharing’ tab select the ‘Apple (AFP)’ menu item, and then select ‘Add Apple (AFP) Share’.
FreeNAS Create AFP Share Dialog
Ensure the wizard is in ‘Advanced Mode’ and then set the config as follows:

  • Set ‘Name’ to ‘Time Machine’
  • Set ‘Path’ to your ZFS dataset path
  • Set ‘Allow List’ to ‘@time-machine’
  • Ensure the ‘Time Machine’ box is checked
  • Ensure the ‘Default file permission’ is set to the same as the screenshot
  • Ensure the ‘Default directory permission’ is set to the same as the screenshot

Add Time Machine Backup to OS X

Finally the last step is to configure Time Machine itself to backup to the newly created share.
In OS X, select ‘Time Machine’ from within ‘System Preferences’, and then click the ‘Select Disk’ button.
Add FreeNAS to Time Machine in OS X Dialog
All being well your FreeNAS AFP share should be listed. If you select to use the disk for Time Machine you will be prompted to enter the username and password for the FreeNAS user we created previously. That’s the last step, Time Machine should begin backing up shortly after adding the disk. I recommend that the first backup be completed over Ethernet instead of wireless as the initial backup can take considerable time.

I have used this setup for a couple of years now backing up 4/5 Mac’s with no real issues. Any problems I have ran into have most revolved around sudden shutdowns of the FreeNAS server midway through Time Machine backing up due to power cuts/loss. My Storage is setup using ZFS in striped mirrored mode, meaning I get the best of both for speed and disk redundancy.

Please let me know if you found this guide useful, or spot any mistakes above.

Categories
Tech

Mac Blinking Folder Icon – MacBook Pro 13-inch, Mid 2012 Hardware Fix

Flashing question mark startup error
You gotta love vague error messages

The other day my MacBook Pro (13-inch, Mid 2012) presented a flashing question mark during startup and was unable to boot to the OS. According to Apple docs this means that your Mac can’t find its system software. You gotta love pretty but vague error messages.

Resetting the NVRAM and holding down the safe mode/verbose boot keys did nothing to help, so I opened up the Mac to see if dust might be causing problems. After a blow out with some compressed air I tried booting again, with no success.
After digging out my external USB 3.0 caddy, I swapped in the SSD and to my surprise the system booted. This ruled out my initial suspicion that the SSD had died.
I let Disk Utility do its stuff checking the disk and OS, but didn’t report any issues apart from some minor permissions errors, nothing big enough to stop the OS booting though.

My focus turned to the MacBook’s internal HDD SATA connector, which is just a flimsy piece of thin metal with some embedded contacts. Luckily I had another MacBook Pro (13-inch, Late 2011) on hand and both HDD connectors looked very similar, so I swapped in the donor connector, popped the SSD back in and to my relief the Mac booted as normal.

Replacing the HDD connector

The local authorised Apple service centre wanted to charge over £100 + VAT for the replacement part and labour costs. Not wanting to get ripped off I ordered a replacement part off eBay for ~£25 inc postage. The SATA connector part number for my MacBook Pro (13-inch, Mid 2012) is: 821-1480-A, just search that on eBay.

Replacement A1278 HDD part
The replacement part I received

After reading online I can see people run into this problem for different reasons. In this particular case it happened to be a physical hardware fault, and not a software fault as most people seem to encounter.
After close examination I noticed the old cable connector was shiny on the underneath near the screw holes. My guess is that the back of the connector slowly rubbed against the chassis over time (caused by movement/vibrations) and was now creating a short of some kind, stopping the SSD from functioning normally.

Categories
Tech

Flush DNS OS X Yosemite 10.10.4 – discoveryutil command not found

With the recent update of OS X Yosemite to 10.10.4, the usual way of flushing the DNS using discoveryutil no longer works.

$ sudo discoveryutil mdnsflushcache; sudo discoveryutil udnsflushcaches
sudo: discoveryutil: command not found

discoveryutil has been replaced by mDNSResponder in 10.10.4.
The following command should clear the DNS cache.

sudo killall -HUP mDNSResponder
Categories
Tech

Burn Xbox 360 XGD3 games in OS X, Finally!

I have been using my Hackintosh Pro now for over 3 years and in general I am very happy with it. However, up until now I still had to dual boot into Windows whenever I wanted to burn an Xbox 360 game backup.

Today I can finally get rid of my Windows partition as I found a great tutorial with excellent step by steps to successfully burn an XGD3 game within OS X using a nifty little app called isoBurn from the AppStore.