With the recent release of macOS Sierra 10.12 (previously OS X) my current OS 10.10 Yosemite install has been pushed to n-2 support status (Apple supports 2 versions prior the current release), meaning Apple will drop support for security updates upon the next release of macOS, presumedly due 2017. This means the time has come to update my 10.10 Yosemite install to 10.12 Sierra.
I decided to just skip the 10.11 El Capitan release and perform a fresh install. Over the weekend I managed to get a fresh Sierra install working on a spare HDD, allowing me to test its stability whilst still running my daily workhorse Yosemite install.
Nearly everything works as it should; bluetooth, GPU HW acceleration, sound, ethernet. Once again the only thing not working properly is sleep/wake/hibernate. But I remain persistent to get those working with this release and install.
Below is a summarised step of instructions I performed to get a persistent working install, please note you will need access to an existing installation of OS X to perform the Hackintosh installation.
- Download the latest version of Sierra through the Mac App Store on the existing Mac.
- On a Windows installation, insert an 8GB (minimum) USB drive and quick format it to FAT32.
- Insert USB stick into the existing Mac and use Disk Utility to name the drive ‘USB’ as well as formatting the volume type: Mac OS Extended (Journaled).
- Using terminal, create a bootable USB installer by entering the following command
sudo /Applications/Install\ macOS\ Sierra.app/Contents/Resources/createinstallmedia --volume /Volumes/USB --applicationpath /Applications/Install\ macOS\ Sierra.app --nointeraction - Download the latest version of the Clover bootloader (r3793 at the time of writing)
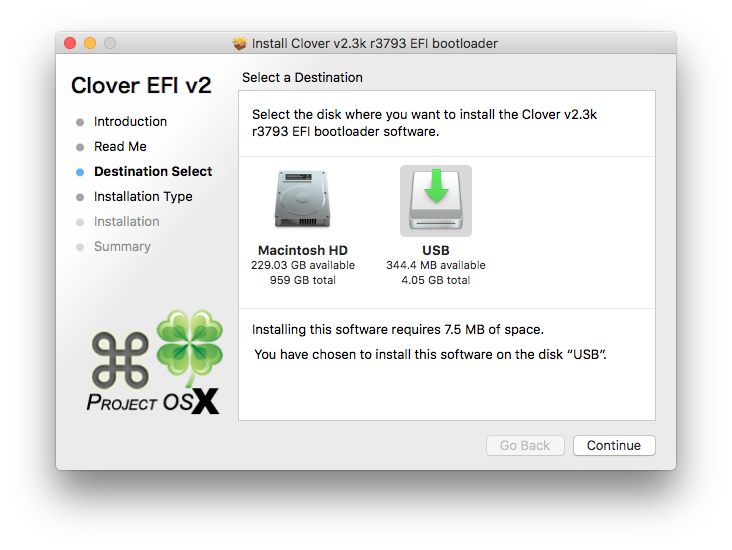
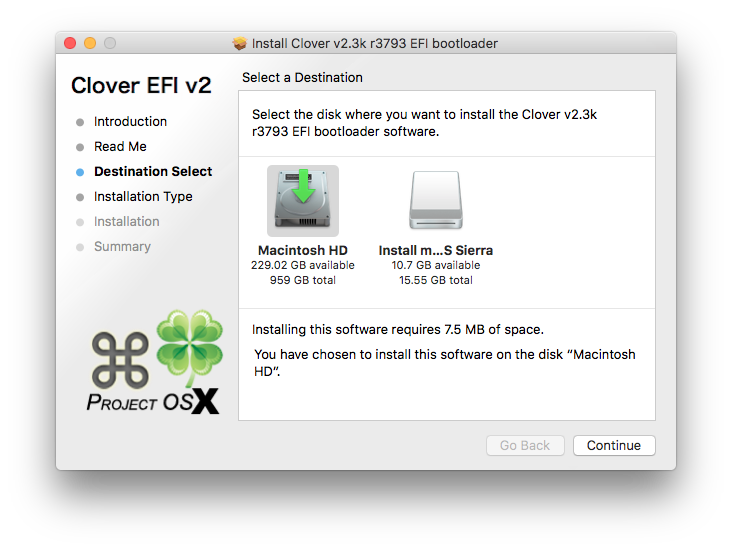
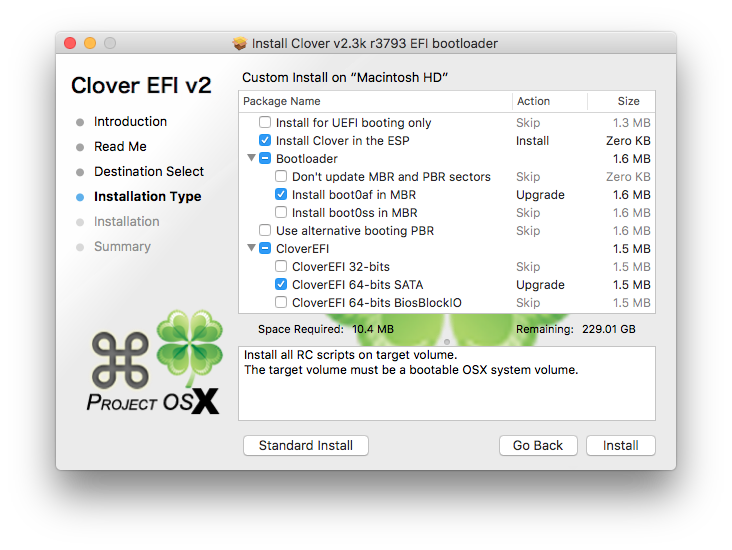
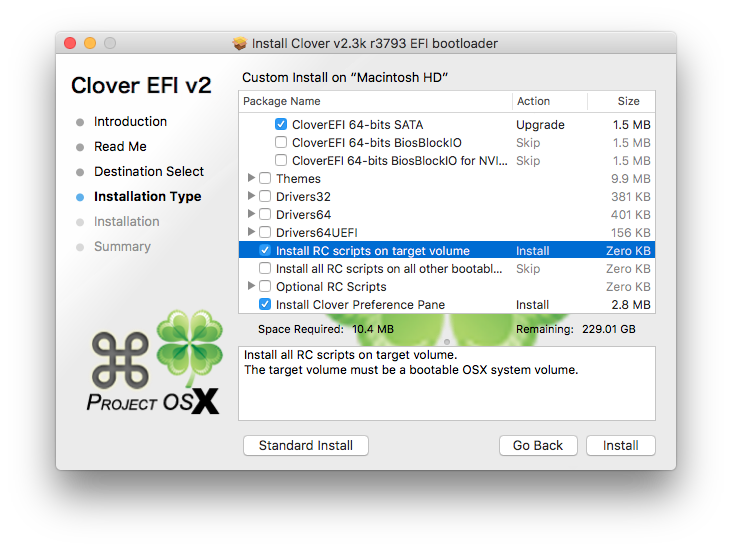
- Run the Clover installer and ensure that the USB is selected as the installation location, customise the config to mirror the settings below
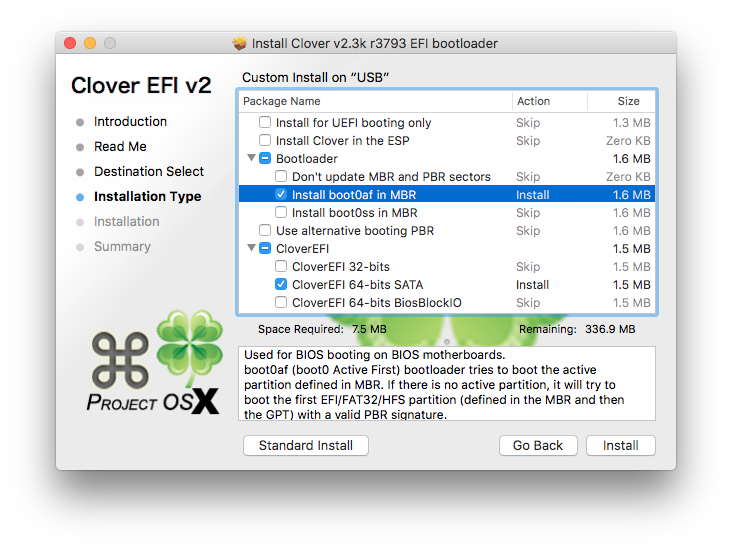
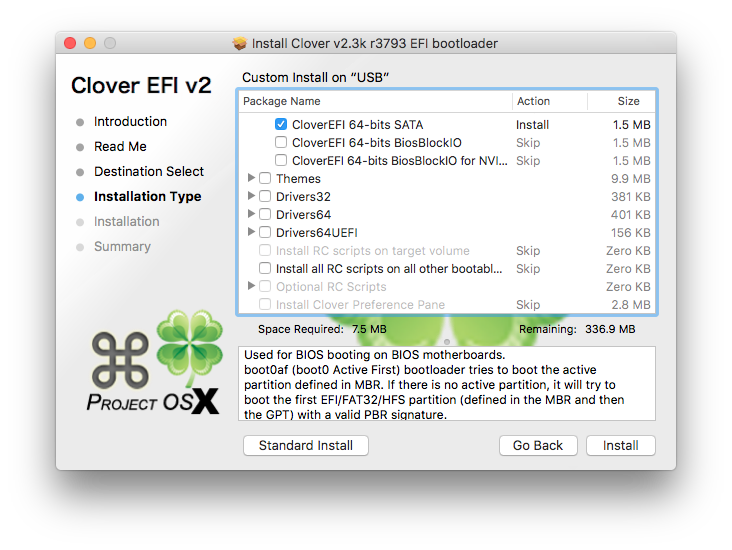
- Replace on the drive /EFI/CLOVER/config.plist with the config provided here
- Download and extract FakeSMC, NullCPUPowerManagement and RealtekRTL8111 to EFI/CLOVER/kexts/other
- Insert the USB in the X58A-UD3R Hackintosh, hit F12 on boot and boot from the USB installer
- When prompted by the Clover bootloader, boot from the macOS installer USB
- Install macOS Sierra as normal to your target drive. When the installer reboots the machine, ensure that you boot from the USB key again using F12, but then select to boot from the target drive in the Clover menu to finish off the installation
- When the install is finished, download Clover again and install it to the target drive using the following settings
- Mount the EFI partition on the target drive using Clover Configurator
- Replace on the EFI partition /EFI/CLOVER/config.plist with the config from the USB
- On the EFI partition; create a folder at /EFI/CLOVER/kexts/10.12 and copy FakeSMC, NullCPUPowerManagement and RealtekRTL8111 from the USB into it.
- Download the relevant DSDT file for your X58A-UD3R (dependant on installed BIOS) from the DSDT database here and rename/copy to the EFI partition at /EFI/CLOVER/ACPI/patched/DSDT.aml
- Reboot the Hackintosh, remove the USB and you should be able to boot the target drive using the Clover bootloader (now installed on the target drive itself)
- I was able to get audio working by using clover configurator to disable SIP and then using Toleda’s scripts for Sierra to fix the audio
This install is still a work in progress for me and will be updated as time goes on and I hopefully get more things working.