Categories
Tech

macOS 10.12 Sierra GA-X58A-UD3R Hackintosh install (Clover)

macos-sierra-logo

With the recent release of macOS Sierra 10.12 (previously OS X) my current OS 10.10 Yosemite install has been pushed to n-2 support status (Apple supports 2 versions prior the current release), meaning Apple will drop support for security updates upon the next release of macOS, presumedly due 2017. This means the time has come to update my 10.10 Yosemite install to 10.12 Sierra.

I decided to just skip the 10.11 El Capitan release and perform a fresh install. Over the weekend I managed to get a fresh Sierra install working on a spare HDD, allowing me to test its stability whilst still running my daily workhorse Yosemite install.

Nearly everything works as it should; bluetooth, GPU HW acceleration, sound, ethernet. Once again the only thing not working properly is sleep/wake/hibernate. But I remain persistent to get those working with this release and install.

Below is a summarised step of instructions I performed to get a persistent working install, please note you will need access to an existing installation of OS X to perform the Hackintosh installation.

  1. Download the latest version of Sierra through the Mac App Store on the existing Mac.
  2. On a Windows installation, insert an 8GB (minimum) USB drive and quick format it to FAT32.
  3. Insert USB stick into the existing Mac and use Disk Utility to name the drive ‘USB’ as well as formatting the volume type: Mac OS Extended (Journaled).
  4. Using terminal, create a bootable USB installer by entering the following command
    sudo /Applications/Install\ macOS\ Sierra.app/Contents/Resources/createinstallmedia --volume /Volumes/USB --applicationpath /Applications/Install\ macOS\ Sierra.app --nointeraction
  5. Download the latest version of the Clover bootloader (r3793 at the time of writing)
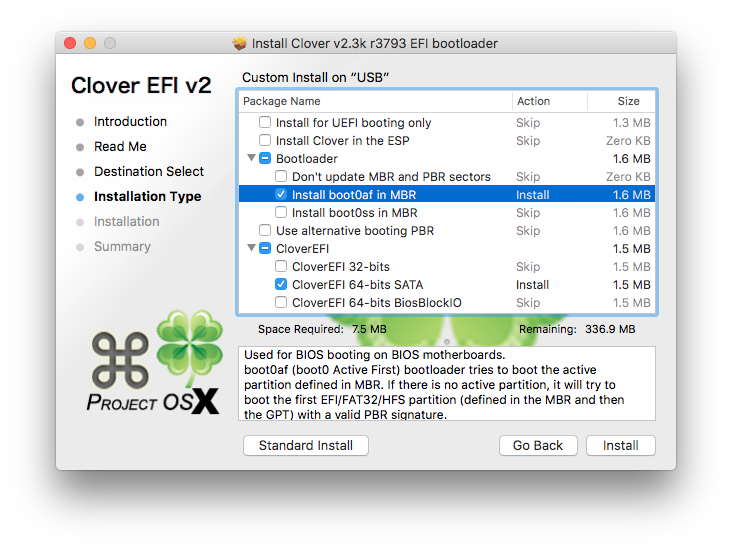
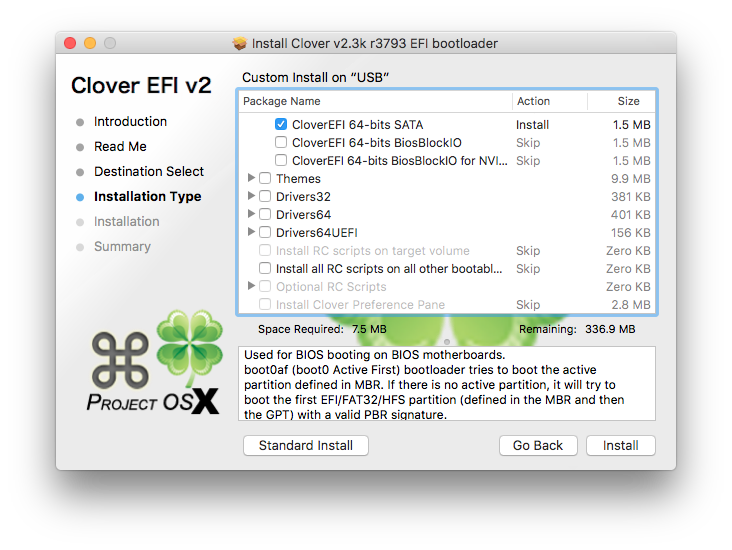
  6. Run the Clover installer and ensure that the USB is selected as the installation location, customise the config to mirror the settings below
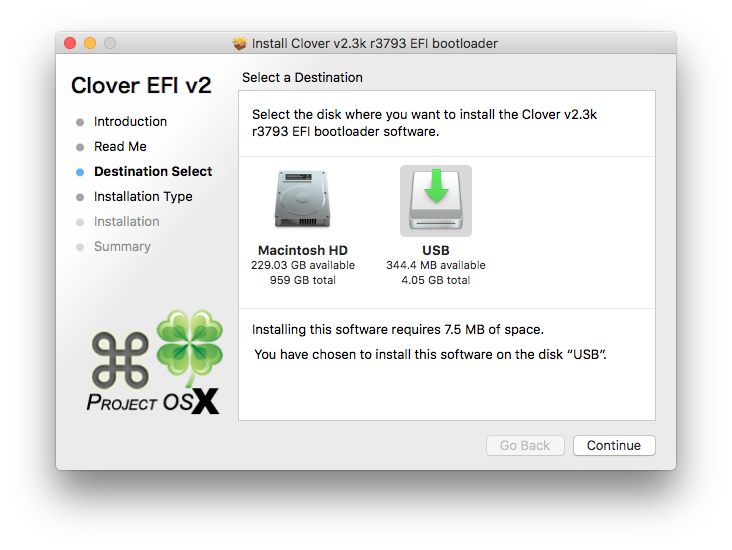
    Select USB as the installation location
    Clover configuration options for GA-X58A-UD3R page 1
    Clover configuration options for GA-X58A-UD3R page 2
  7. Replace on the drive /EFI/CLOVER/config.plist with the config provided here
  8. Download and extract FakeSMC, NullCPUPowerManagement and RealtekRTL8111 to EFI/CLOVER/kexts/other
  9. Insert the USB in the X58A-UD3R Hackintosh, hit F12 on boot and boot from the USB installer
  10. When prompted by the Clover bootloader, boot from the macOS installer USB
  11. Install macOS Sierra as normal to your target drive. When the installer reboots the machine, ensure that you boot from the USB key again using F12, but then select to boot from the target drive in the Clover menu to finish off the installation
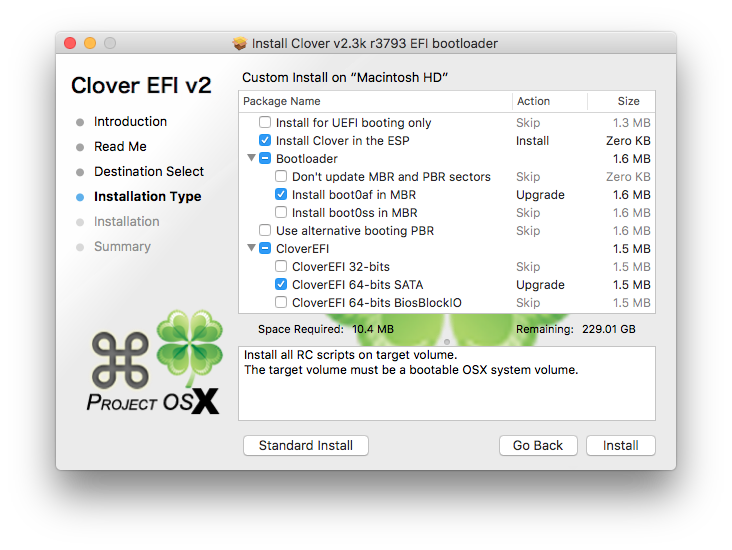
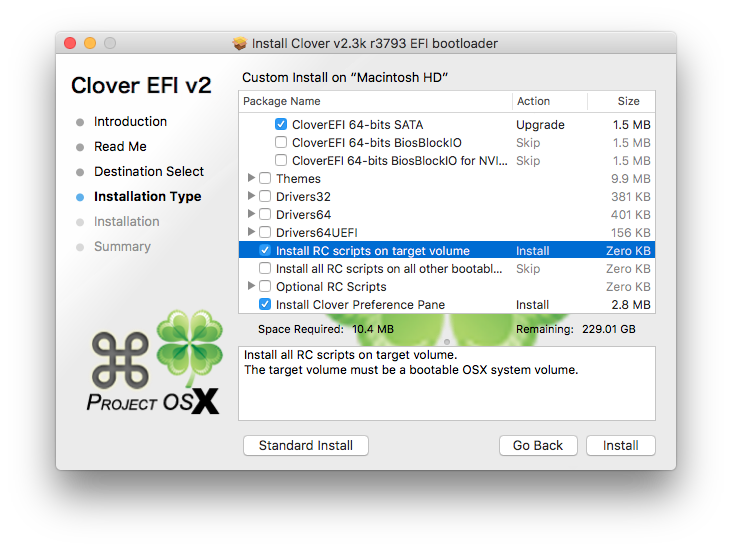
  12. When the install is finished, download Clover again and install it to the target drive using the following settings
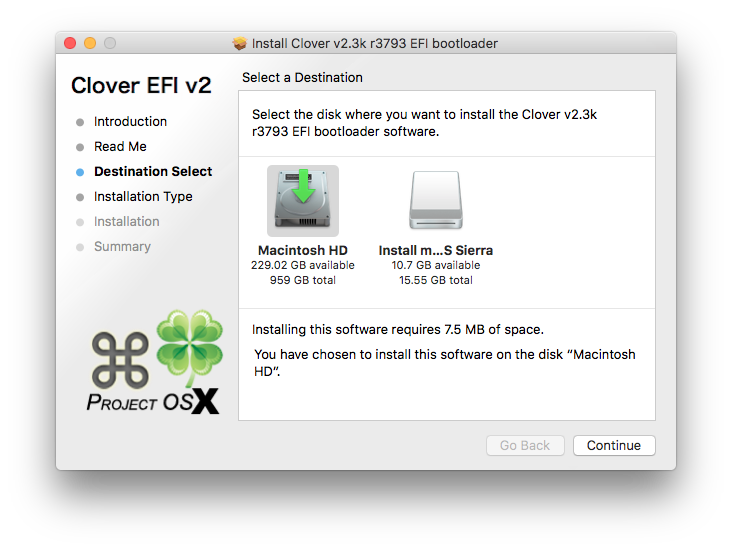
    Ensure that the target drive is selected for the installation location
    clover-legacy-config-options-page1
    clover-legacy-config-options-page2
  13. Mount the EFI partition on the target drive using Clover Configurator
  14. Replace on the EFI partition /EFI/CLOVER/config.plist with the config from the USB
  15. On the EFI partition; create a folder at /EFI/CLOVER/kexts/10.12 and copy FakeSMC, NullCPUPowerManagement and RealtekRTL8111 from the USB into it.
  16. Download the relevant DSDT file for your X58A-UD3R (dependant on installed BIOS) from the DSDT database here and rename/copy to the EFI partition at /EFI/CLOVER/ACPI/patched/DSDT.aml
  17. Reboot the Hackintosh, remove the USB and you should be able to boot the target drive using the Clover bootloader (now installed on the target drive itself)
  18. I was able to get audio working by using clover configurator to disable SIP and then using Toleda’s scripts for Sierra to fix the audio

This install is still a work in progress for me and will be updated as time goes on and I hopefully get more things working.

Categories
Tech

Plex – An update is available error

Plex Logo

A few years on from installing Plex in my home lab and I must say I’m hooked. The ability to stream personal media to a variety of different devices (Mac, iOS, PS4, Fire TV Stick..) wherever I happen to be in the world is simply.. just awesome! It’s like having your own private Netflix streaming service.

However one problem that had annoyed me since my first install was a bug that displayed a notification informing a Plex server update was available. Regardless if the server was fully up-to date or not the notification remained in place. I remember trying to find a solution when the error was first realised however since it wasn’t impacting any functionality I must of given up my search fairly quickly.

Fast forward a few years and I finally have found a solution, as simple as it happens to be. So if you to have the issue of a constant notification under ‘Server’ -> ‘General’ saying “An update is available. Please install manually”, all you have to do to get rid of the message is ensure you are running the latest version of Plex and then simply sign out and then back in again on the server itself. To ensure I was actually signing out/in on the server I entered the private IP address of my Plex server and performed the actions from there.

As stupid of a solution it is I hope it helps. After years of a nagging error message, alas no more!

Categories
Tech

Using Buildroot for IoT Projects

Buildroot RPi Yocto Logos

Early on in my effort to build a digital dash for my car I quickly realised I needed to run a stripped down version of Linux if I was to have any chance of getting the dash to boot up quickly on the Raspberry Pi. A dash that kept you waiting for tens of seconds or at worst minutes to turn on wouldn’t exactly be the most practical of solutions (especially if you want to avoid speeding fines hehe).

So I was faced with the situation of taking one of the existing distributions available for the RPi and modding it for my own use, or having a crack at making something myself that would do the job. Initially I did start tinkering around with seeing how fast I could get stripped down versions of Raspbian and Arch booting up, which although was interesting did feel as though I was spending a lot of time and effort digging down in the dirt and undoing a lot of work someone else had already spent a lot of time doing. Therefor instead of trying to tear something down to suit my needs, I decided to focus my attention to incrementally building something useful from the ground up. I figured doing it this was would be a great source of learning as I would no doubt begin to run into obstacles other people have already created solutions for, meaning I would appreciate the open source communities hard work even more so.

After a bit of searching I found a couple of promising looking projects to base my dash on (I really didn’t feel like totally reinventing the wheel). Both Buildroot and the Yocto Project share the common goal of creating a complete, easy to customise, embedded Linux system. Both compile Linux from source using cross-compilation (which should cover most performance requirements), are well documented, actively maintained and already used within the embedded systems industry. In fact I had already been exposed to the Yocto project before without even realising when I attended an Intel Edison workshop at the London FabLab, as the Linux image supplied by Intel for use on the Edison is a Yocto build.

Whilst I already had some experience with Yocto I decided to kickstart my digital dash using using Buildroot. Namely in the effort of simplicity as to get started with Buildroot is just so easy. The documentation available is awesome and provides a steady learning curve. I also found a pretty good short book on using Buildroot with the RPi which was neat primer. After a bit of tinkering I had the environment setup in a Ubuntu VM as well as a working filesystem that booted in seconds on my RPi2. I quickly appreciated the number of tools available out of the box in major Linux distributions as theres really not much to do in a basic buildroot build other than logging in and a few system utils to work with.

It was not before long I had my buildroot environment stored under Git and had automated a few of the basic build commands, such as copying over custom apps after a successful build and flashing the filesystem to SD card. All in all it didn’t take a ton of effort to get a simple enough system working that booted up fast, was capable of connecting to the Internet and launched my prototype app on boot. My prototype app is built using QT with PyQT bindings, both of which buildroot supports although not the latest versions.
I would happily recommend Buildroot to anyone who wants to learn more about Linux targeted for embedded devices and IoT projects, it really is a pleasure to work with and the community behind it is very resourceful and helpful.

Looking towards the future for my digital dash there may come a time where I may have to look to migrating towards other projects like Yocto. Buildroot is great and pretty much does everything I need at this point in time, however it does have what I consider to be quite a big no-go – especially in the IoT community. There is no package management system and no binary packages, meaning updates to the system are not possible via packages. If a future release of the Linux kernel fixes a security vulnerability, a full system update would be required which would involve physically removing the SD card and updating the software manually. Best practices for building IoT devices include having an inbuilt mechanism from the word go, allowing for critical updates to be issued that threaten to compromise the device without having to rely on the end user to manually update their device.

All of this is subject to change I guess, Buildroot could one day change how they do things. For now I’m sticking with them as I’m the only one working on the dash project, but being the responsible security guy I am if I open up the project for others to tinker with I would want to switch to another project that supported some form of inbuilt updating.

Anyway it’s about time I get back to finishing rebuilding the engine for the Mk1 so I can actually test the dash in-car for once instead of on my desk!

Categories
Tech

MegaSquirt 3 Digital Dash

I am pleased to introduce a little side project that I have been working on the past few months. The projects initial main focus is to create a HD digital dashboard for the MegaSquirt ECU, to be built using as much off the shelf hardware as possible. This means that hopefully with some conscious design planning it should be possible to produce copies fairly easily just by following some documentation and ordering a few bits of the Internet here and there (This is the plan at least, who knows how things will pan out). Theres no reason other ECUs can’t also be supported in the future, however thats the only aftermarket ECU I have at hand and since thats what I run in my cars.

Project Brief

Create a digital dashboard that respects the character and history of the original cluster gauge, whilst also providing access to additional sensor readings that are important for any turbocharged engine.

And so after a bit of hard work this is what I have come up with for now..

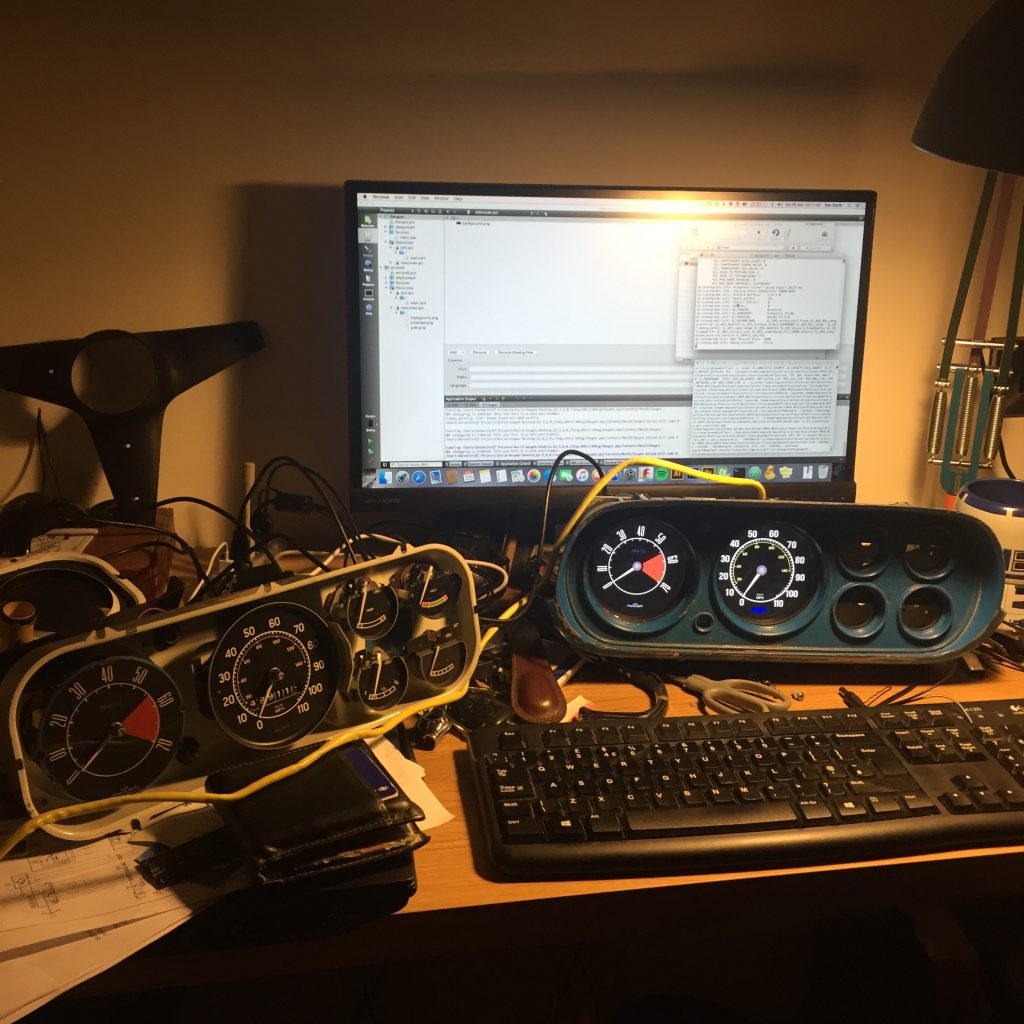
Mk1 Escort Digital Dash
The original dash is on the left (front cover removed)

The dash features an 8 inch 1080P LCD display powered by a Raspberry Pi 2 (soon to be RPi 3) running a stripped down build of Linux to allow for fast booting. The dash communicates with the cars MS3 ECU via CAN bus and will include some additional power features that allow it to turn on/off safety via a switched ignition input.

The main motivation for having a digital dash is to take advantage of displaying all the extra sensor data the MS3 ECU utilises and accumulates. There are sensor outputs and ECU calculations that I would be interested in knowing whilst driving, but at the same time I don’t with to clutter the dash with additional gauges and dials as that would spoil the general aesthetics of the interior. Creating a digital dash in the same style as the original dials is a good compromise on having access to the data and not ignoring the originality of the car.

The development and install of the first dashboard will be a prototype version retrofitted into my Mk1 Escort. This type of instrumentation is something that I have wanted for many years, however it wasn’t until recently that I felt I had gained the right knowledge sets and courage to attempt such a project and not forgetting the funds to back. Believe me when I say this has been a long time in the works.

I will post more details on the project in the upcoming weeks but for now just wanted to give a glimpse into some of the more complicated long term projects I’m working on.

Categories
Tech

Fixing FreeNAS error: Currently unreadable (pending) sectors

I recently received a critical alert email from my FreeNAS box with the following error:

Device: /dev/ada3, Self-Test Log error count increased from 0 to 1
Device: /dev/ada3, 1 Currently unreadable (pending) sectors

Rather glad to know the email alerts I setup is working reliably, but looks as though I might have a few bad sectors on one of my drives.
The following commands resolved the error without resulting in any downtime.

The drive in question was /dev/ada3, so first login to a shell on your FreeNAS box as root and run a SMART long self-test (Replace adaX with your corresponding device).

smartctl -t long /dev/adaX

After the test has finished (It might take a few hours) view the results.

smartctl -a /dev/adaX

From the results remember the sector size and the location of the faulty sector (LBA_of_first_error).
In my case my sector size was 512 and LBA_of_first_error was 3082982872.

To correct the SMART error we will zero out the bad sector(s) on the drive, but first we need to permit access to drive.

sysctl kern.geom.debugflags=16

Now zero the sector stated in self-test results out.
Replace of=/dev/adaX, bs=512, seek=3082982872 with values relevant to your drive.

dd if=/dev/zero of=/dev/ada3 bs=512 count=1 seek=3082982872

Re-run the SMART report command to check if the ‘Current_Pending_Sector’ is now showing 0.

smartctl -a /dev/adaX

To check the ZFS file system integrity run a scrub of the pool, replace poolX with the pool name the drive is under (list pools with ‘zpool list’).

zpool scrub poolX

Finally check the output of the scrub to ensure there are no known data errors.

zpool status -v poolX